
So, I’ve been flying RC planes for about 3 years now, and last year I really got hot and heavy into sailplanes. Most of what I had flown before were small handlaunch and wing-type-things, but then I finally got a “standard” sized 2-meter sailplane. I soon found out that doing work on one of these things at the field is a major pain in the butt -- unless you have a stand of some sort. On a couple of occassions, I was lent the use of a Super-Stand (or maybe it was a Better Stand?). A great little tool, but the cost of either of those is $70-$90! So, I got to thinking... "How can I make a sailplane field stand without spending more on the stand than I did on my airframe?"

After doing a bit of research ‘round the web (but mostly at LiftZone’s forums), I found a couple of cheap DIY field stands (most notably this one), but they were still lacking the features of the Super-Stand (like being collapsible, adjustable, and the ability to weather-vane). What to do?

Inspiration struck, and I quickly sketched out my plan on a piece of notebook paper. In my mind, I made up a list of features I’d want in this stand.
So, with $10 in my pocket, I headed down to Home Depot and picked up what I thought I needed.
All told, it was well under $10 for all of the supplies -- the biggest challenge was getting the 10' PVC pipe in my car! Luckily, my Nissan Maxima has a handy "ski-hole" in the rear armrest, and it fits perfectly from the rear of my trunk to the front of my dash.
From your 10' section of 1/2" PVC...
Note that this is 118" exactly, so don’t go over too much on your cuts!
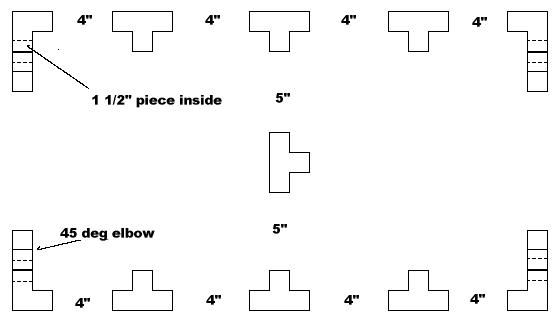
First off, let’s build the base of the thing. This uses the 1 1/2", 4" and 5" pieces, all 7 of the tees and 4 of the 90° elbow pieces.

click to embiggen
3/4 View
Connect 4 of the 4" pieces together with 3 of the tees to make one side, and then repeat for the other side.
Connect the two sides together by putting one of the 5" pieces into the center tee of each side, and connect those two 5" pieces (now connected to the sides) with another tee.
On the ends of each side, connect a 90° elbow. Into each elbow, insert 1 of our 4 1 1/2" pieces. Then take one of our 45° pieces and put that onto the exposed end of the 1 1/2" pieces. This should completely (or almost completely) hide the 1 1/2" piece from our sight.
click to embiggen
Base View
You should now have something approximating the image above.
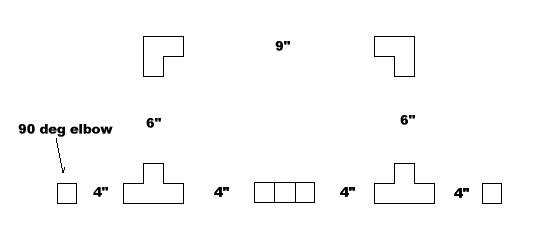
Now, let’s make the side pieces. These are simple! Just take 1 of our 9" pieces, and put two 90° elbows on either side. In the vacant holes of each elbow, fit 1 of the 6" pieces. Then fit the 2 6" pieces into their corresponding empty tees in either side.
click to embiggen
Side View

click to embiggen
Front View
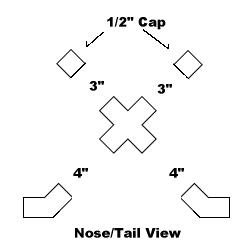
Finally, we’ll be making the front and rear “nose and tail holder” pieces. Find our 2 crosses, and put 2 3" pieces in one half of the “X”, and put 2 4" pieces in the other half of the "X". On top of the 3" pieces, put 1 1/2" cap. Fit the 4" pieces into the 45° elbows at either end.
click to embiggen
Front View
I haven’t quite figured this one out yet, but I’ll probably get another piece of PVC pipe (1" or bigger) and a cross, and make a cruciform stake I can step into the ground. The other alternative is to use a small hex nut so I can mount this thing on my camera tripod. More on this later!
Make sure to tap everything together to ensure a tight fit, and make sure it’s all square. I just put the stand on the floor of my basement and tapped lightly with a hammer. I rubber mallet might be a better choice, but mine was outside, and it was really cold.
You may want to use some PVC glue to secure some of the non-adjustable pieces together. This will probably help in the long-run, and keep you from having to re-tap it together all the time.
To make the adjustable parts easier to move, but to still keep them in place, try sanding the ends of the pieces on which the movement occurs. It shouldn’t take a whole lot to loosen it, and you don’t want to over-do it.
That’s about it! I’ve successfully made a mountain out of a mole-hill, I think! It’s really quite simple, but I thought for sake of completeness, I’d fully document this little project.

Thanks to taking a look. I hope this proves helpful to someone. If you have any questions, comments, concerns, or want to let me know how to improve this, just drop me a line! ben [at] thelocust [dot] org is my email address (replace [at] with @, and [dot] with .)! Oh, and I fly with the guys from Louisville Area Soaring Society. Come out and join us!
< back